Configuring SAML-Based Single Sign-On (SSO)
Overview
This guide explains how to enable SAML-based Single Sign-On (SSO) for seamless access to Paperbox. SAML (Security Assertion Markup Language) allows your Identity Provider (IdP) to authenticate users on behalf of Paperbox, eliminating the need for separate Paperbox credentials.
Prerequisites
- You must have administrator rights on your identity provider (Microsoft Entra, Okta, etc.).
- You must be able to configure a SAML application and provide its details to Paperbox.
1. Summary
1.1 Service Provider (Paperbox) Info
When you set up Paperbox as the Service Provider (SP) inside your IdP, you’ll be asked for:
Entity ID
https://paperbox-<env>.firebaseapp.com/__/auth/handler<env>can beacc(acceptance) orprd(production).- This serves as the unique identifier for Paperbox within your IdP.
Assertion Consumer Service (ACS) URL
https://paperbox-<env>.firebaseapp.com/__/auth/handler- Same URL as Entity ID.
- This is also called the Reply URL or Redirect URI, where the IdP will send the SAML assertion after a user logs in.
Make sure to copy these exactly into your IdP’s SAML configuration fields.
1.2 Identity Provider (IdP) Info
Paperbox will need the following from your IdP:
SAML Login URL (or Single Sign-On URL)
- Example (Microsoft Entra):where
https://login.microsoftonline.com/<tenantId>/saml2<tenantId>is your Microsoft Tenant/Directory ID. - For other IdPs, this URL will be provided once you create the SAML application.
- Example (Microsoft Entra):
X.509 Certificate
- A public certificate used by Paperbox to verify the authenticity of SAML responses. It is typically in the format:
-----BEGIN CERTIFICATE-----
...
-----END CERTIFICATE----- - Download this certificate from your IdP’s SAML or Security settings.
- A public certificate used by Paperbox to verify the authenticity of SAML responses. It is typically in the format:
1.3 Required SAML Attribute
Paperbox needs the NameID attribute to be user.mail in the SAML assertion:
- NameID Attribute: Usually
user.mail,Email, or a similar claim name.
This attribute tells Paperbox which user is logging in.
1.4 User Roles
By default, Paperbox recognizes the roles:
- user
- admin
When you assign roles in your IdP, these roles can be passed in the SAML assertion to Paperbox, or Paperbox can map them after the user logs in.
2. Step-by-Step Configuration
Below are generic steps with Microsoft Entra (Azure AD) screenshots. Your IdP’s screens may differ, but the process is similar.
2.1 Create a New SAML Application in Your IdP
- Open your IdP’s admin console (e.g., Microsoft Entra -> App Registrations or Okta -> Applications).
- Create a new SAML application.
- Give it a recognizable name (e.g., “Paperbox SSO”).
- Look for a field labeled Reply URL, ACS URL, or Redirect URI. Enter the Paperbox URL:
https://paperbox-<env>.firebaseapp.com/__/auth/handler - Save these initial settings.
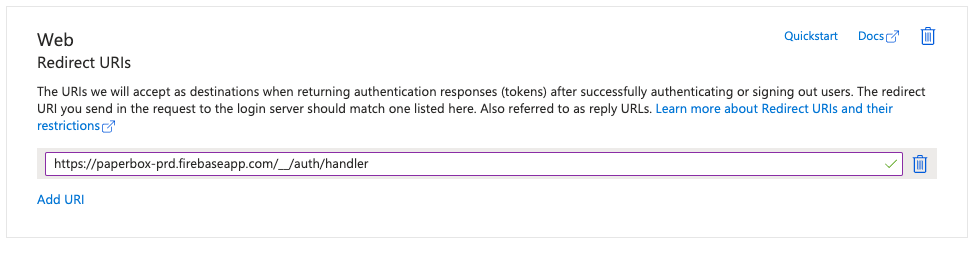
Microsoft Entra → App Registration → Authentication
2.2 Provide the Service Provider (Paperbox) Details
- Locate the Entity ID or Identifier field in your IdP’s SAML setup.
- Enter the same URL:
https://paperbox-<env>.firebaseapp.com/__/auth/handler
- Enter the same URL:
- Locate the ACS (Reply) URL field.
- Enter:
https://paperbox-<env>.firebaseapp.com/__/auth/handler
- Enter:
- Save/Update these settings.
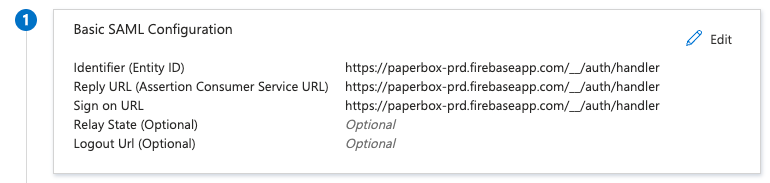
Microsoft Entra → Enterprise Apps → Single Sign On
2.3 Release the Required User Attribute (user.mail)
- Locate the attribute/claim configuration in your IdP’s SAML settings.
- Add/Edit the claim that sends the user’s email.
- It might be named
user.mail,userPrincipalName, orEmail. - Verify it’s mapped to the user’s email address in your directory.
- It might be named
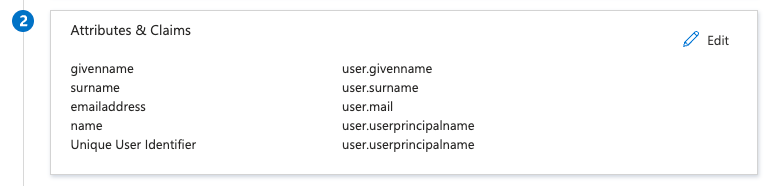
Microsoft Entra → Enterprise Apps → Single Sign On
2.4 Obtain and Share Your IdP Metadata
- Download the IdP metadata or copy the SAML Login URL and X.509 Certificate.
- Send this information to Paperbox so we can complete our SP configuration:
- SAML Login URL
- X.509 Certificate
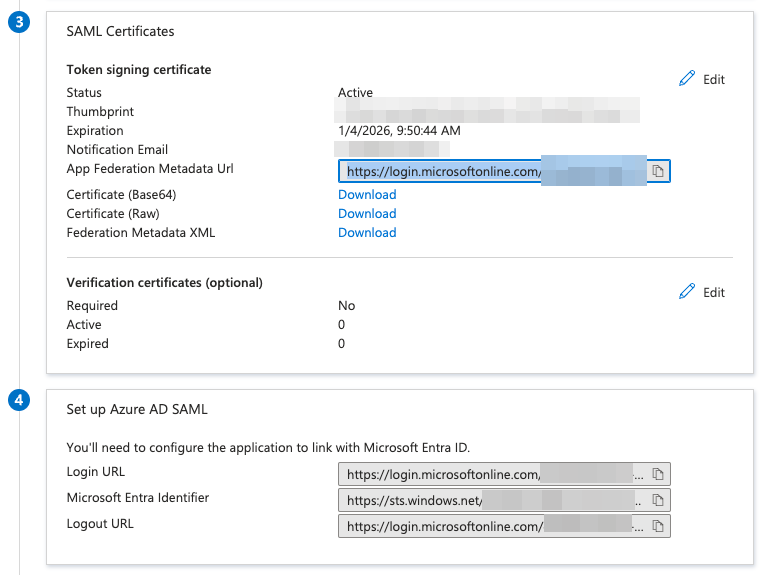
Microsoft Entra → Enterprise Apps → Single Sign On
2.5 (Optional) Configure Roles in Your IdP
If you plan to manage Paperbox roles from your IdP:
- Create Roles named
userandadmin. - Assign these roles to users in your IdP.
- Map these roles to the SAML assertion if required (depends on the IdP).
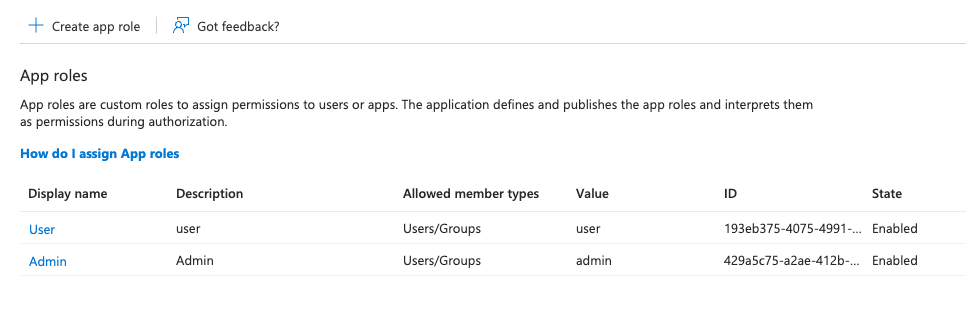
Microsoft Entra → App Registration → Roles
3. Contact Paperbox for Final Setup
Once you have the SAML Login URL and X.509 Certificate:
- Send them to Paperbox support or your Paperbox representative.
- Paperbox will apply these details in our Service Provider configuration.
- We can also perform a test sign-in if you provide a test account, verifying the setup.
4. Testing & Validation
- Perform a Test Login to Paperbox using SSO.
- Confirm that:
- You are successfully redirected to your IdP’s login page.
- After logging in, you are returned to Paperbox and can access your workspace.
- Your user attributes (especially email) are correct.
- Verify User Roles if applicable:
- Check that users are assigned
useroradmincorrectly in Paperbox. - Assign new roles in your IdP as needed.
- Check that users are assigned
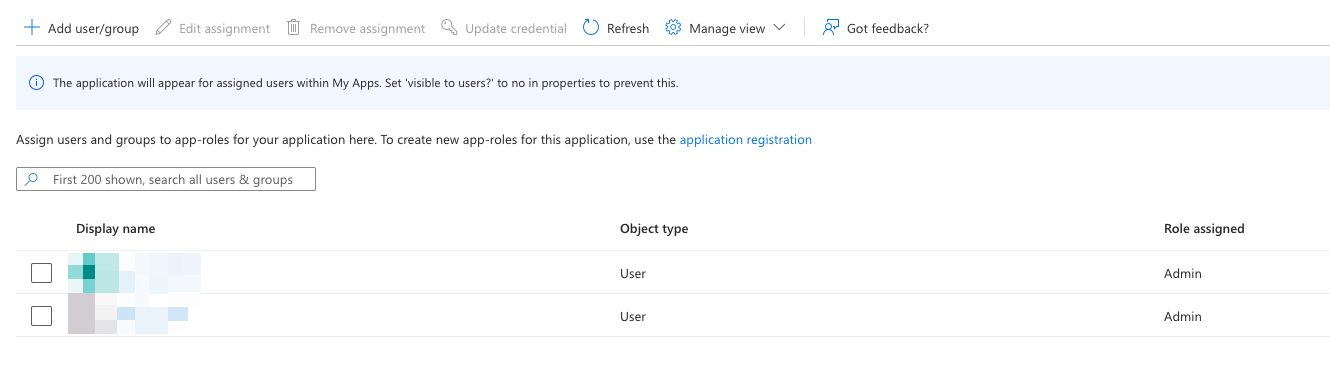
Microsoft Entra → Enterprise Apps → Users and Groups
Conclusion
Enabling SAML SSO in Paperbox provides a smoother login experience and centralizes security. By following the above steps—configuring your IdP with Paperbox URLs, sharing the SAML Login URL and certificate, and releasing the correct user attributes—you’ll ensure your organization enjoys seamless, secure access to Paperbox.